Courses are perfect for creating learning with multiple formats, including quizzes. Courses have more options and the editor looks a little different to standalone learning objects.
Creating a course within your Go1 Portal
1. Log in to your Go1 portal using your administrator email and password
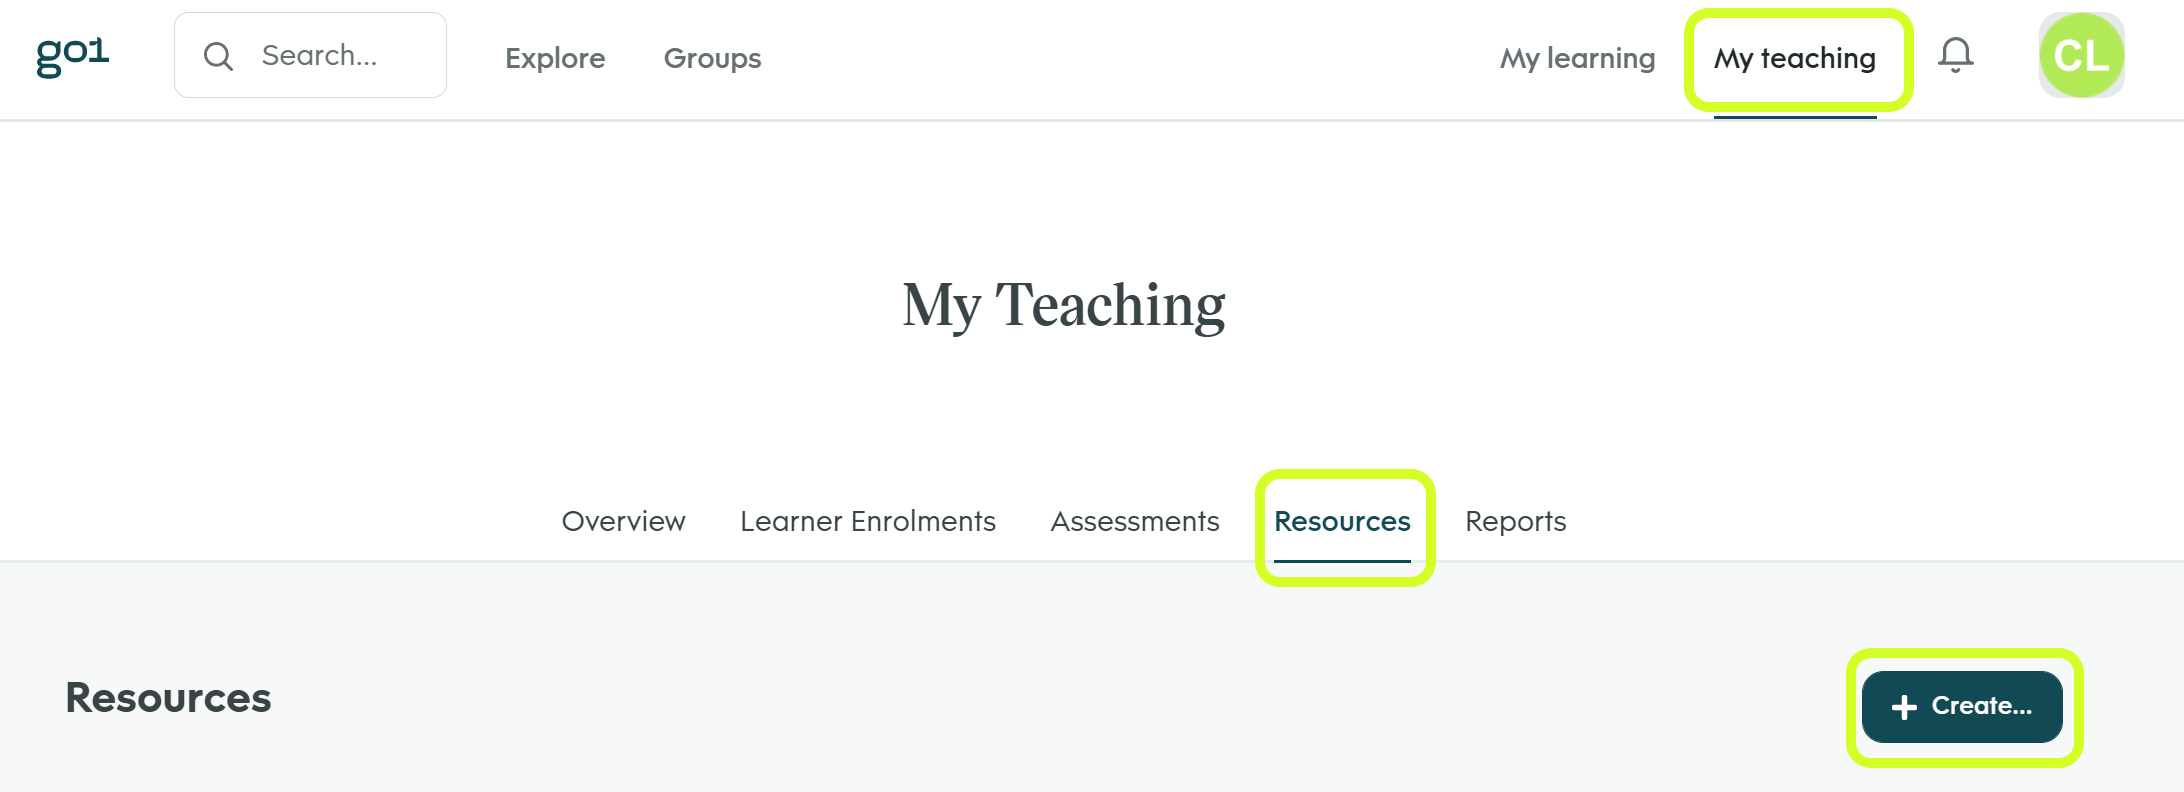
2. Click ‘My Teaching’ at the top of the page
3. Select the ‘Resources’ tab
4. Click ‘Create’ and select ‘Course’ from the drop-down menu. A dialogue box will appear where you can fill in the title, description and image. Only the title is mandatory at this point - click ‘Create’ when you are done.
The following steps will walk you through building your course.
The Course Editor
Once you have added a title and clicked ‘Create’, you will be taken to the course editor. You will see that it has two tabs: ‘Details’ and ‘Structure’.
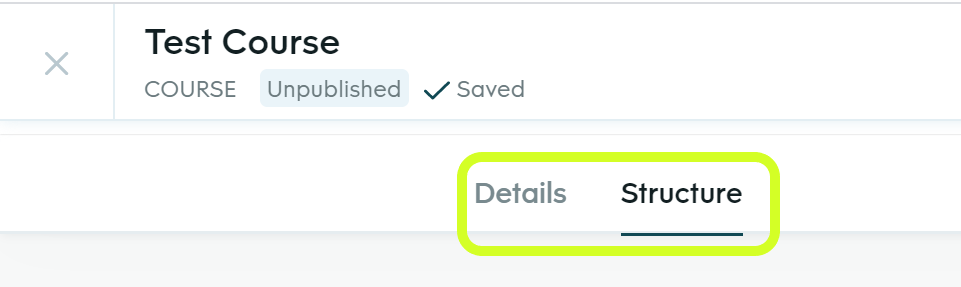
The Details tab contains the metadata for your course. It is the same as the editor for a standalone learning object. Follow these instructions to fill that tab in, working through the fields from the top down.
The Structure tab is where you will build the course structure and add content. It is split into two columns: the left column shows the course structure, and the right column allows you to edit and preview whichever item you have currently selected.
The instructions below will show you how to add content and structure your course.
Course Items
Modules are used to ‘hold’ your learning objects, and you can use modules to break your course up into sections or chapters. Your course will always have at least 1 module by default, but you can add more.
Learning objects are the individual pieces of learning that learners must complete. Learning objects must sit within a module.
The same content types which can be created as standalone learning objects can be added to a course, as well as items for assessment, such as quizzes or single questions.
Add / Edit a Module
Your course will automatically have one module with the default title ‘Module 1’.
You can edit the module name, and add a description (optional) that briefly explains what the module is about.
To edit a module name or description:
- Click on the module in the left column. It should highlight blue.
- If you hover over the module name, a pencil icon will appear - either click this, or click the edit button on the right side column.
- When you are finished, click ‘Done’ to save your changes.
To add a new module:
- Click ‘Add’ at the top of the left column, and select ‘Module’ from the list of options.
- Give your module a name and hit enter.
Add a Learning object
There are two ways to add learning objects to your course.
- Create a new learning object within the course and upload your content
- Add an existing standalone learning object into the course using the content reuse feature.
Create a new learning object
Underneath the module, you want to add the learning object to, click ‘Add learning’, then select the type from the drop-down menu. You will need to give it a title in order to create it (you can edit this later). After you add the learning object to your course, you will need to edit it to upload the file and/or add text.
Content Reuse Feature
The content reuse feature allows you to bundle your existing standalone learning objects into a course. For example, if you have standalone videos that form part of a series, and you want to create each video to be consumed individually, but also combine them in one place to be consumed altogether. The content reuse feature allows you to simply add the standalone items into a course, rather than having to recreate them again within a course.
To use the content reuse feature:
- When you are in edit mode on your course, click the X on the right column to close the item preview
- A list of recent content will appear on the right. (You may notice that some content has been authored by other portals. This is because the content reuse feature can also be used by customer portals to curate a course of various learning objects just for their learners, for example as an onboarding pathway. You cannot publish a course to GO1 Premium or Marketplace that uses content from another content partner.)
- If you just created or edited your learning objects, they should be at the top of the list. For older content, use the search bar at the top to find it.
- Once you have the required item, click the + icon to add it as the last item in your course, or click and drag it into the desired position.
Editing a Learning object
Click on the learning object you would like to edit. If you hover over the name, a pencil icon will appear - either click this or click the edit button on the right-side column.
This will take you to the learning object editor.
Click beneath the item title to add text (optional). Use the editing toolbar to format your text. Images can be added to the text by drag & drop. Select the image then click the picture icon on the text editor toolbar to resize and change image alignment.
For editing text, document, video, interactive, link and LTI type learning objects, continue reading. For editing questions and quizzes, skip ahead to ‘Adding Assessments’.
Below are some considerations to keep in mind when adding content files:
- You can upload items by dragging and dropping a file into the box, or click the button to open file explorer.
- Videos: You can either upload a file or include videos using a YouTube or Vimeo link. Tick the checkbox “Force users to watch this video until the end” if you would like to disable the ability for learners to skip ahead in the video.
- Link: Make sure your link has http:// or https:// at the beginning.
- LTI: In the first field, enter the launch URL for your LTI. If your content is protected by authentication, input the LTI key and LTI secret key in the next two fields. For most LTIs, you will not need the last 3 fields. If you need to use these and you require further assistance, please contact support@go1.com
The ‘Save & Exit’ button in the top right will become active once the upload of your item is complete - click that to save and return to the course overview.
Adding Assessments
The following assessment types can be added to courses:
- Quiz: Quizzes can have up to 50 questions, and you can add a fill-in-blank, matching, multi-choice or long answer questions.
- Single question: choose from Fill-in-blank, Matching or Multi-choice question types.
Editing a Multi-Choice Question
Fill in the question and click ‘Add Answer’ to add as many answer choices as you like. The correct answer(s) are indicated by the YES toggle next to each choice.
Use the toggle on the right to make the answer options appear in random order.
By default, learners will not see any text feedback on their choice, only if they were correct or not. If you would like to add text feedback:
- Click the 3 dots next to the answer option
- Select “Add feedback & score”
- Fill in the feedback the learner will see if they choose or don’t choose that answer option
- Click ‘Done’ to save
The text in the feedback field will appear in a small text box next to the answer after the learner completes the question.
Editing a Fill-in-Blank Question
Write your question with the answer choices inside square brackets, with the correct choice listed first. For example:
The Sun rises in the [east, west, north, south].
You may include multiple blanks in one question, for example:
The Sun rises in the [east, west, north, south], and it sets in the [west, north, south, east].
The answer options will appear in a random order for the learner.
Editing a Matching Question
A matching question requires the learner to match two halves together - a lock and a key.
Fill in the question/instructions for the learner, then:
- Click ‘Add lock’ and type or paste in a lock, then hit enter.
- Click ‘Add key’ and type or paste in a key, then hit enter.
- Once you have added your locks and keys, click and drag each key onto the matching lock.
- Once a key has been added to a lock, it will turn green.
- Click the ‘Shuffle answer’ toggle on to 'ON' to ensure the order of the keys is shuffled for the learner (otherwise they will see them in the order you added them).
Building a Quiz
Once you’ve added a quiz to your course, click edit to start creating it.
You will see there are three tabs: ‘Build’, ‘Configuration’, and ‘Preview’. Let’s start with Build.
- To add questions, click a question type on the left and drag it over to the right.
Please note that long answer questions cannot be automatically graded, therefore they are only intended for use by learning portal administrators who are building courses for their employees. Do not use this question type if your content is going to Go1 Premium or Marketplace. - Repeat as necessary to add the questions you want. If you make a mistake, you can remove a question by hovering over it and clicking the 3 dots, then clicking ‘Delete’.
- Once you have added the number of questions you want, we can fill the questions in. Hover over the first question and click ‘Add’. You will then be able to edit each question following the above instructions for each type.
Once you start adding text to the questions, you won’t be able to save your work until all questions have been edited.
The Configuration tab allows you to adjust the settings on your quiz. It has 3 sections:
- Taking Options: Choose various options including whether learners must answer a question correctly before moving on, time limits, and if/when learners will see feedback. The default setting is that learners won’t be shown feedback. If you added feedback text on multichoice questions, choose “At the end” or “After each question” from the drop-down menu to ensure that learners see the feedback text.
- Pass/Fail options: Here is where you can choose the % result required to pass (75% is the default), and customise the messages learners will see when they pass or fail.
- Result Feedback: Use this if you would like learners to see different feedback messages depending on their score range.
The Preview tab allows you to see the quiz as a learner would.
Moving Items Inside a Course
The order of modules and learning objects can be easily changed inside your course. Hover your cursor over the learning object or module you would like to move. You will see 3 lines on the very left of the learning object or module - place your cursor over this until it changes to an open hand symbol, then click and hold as you drag the item up or down to where you want it to be.
Course Completion Rules
Only use completion rules if it’s essential for you to:
- Ensure learners complete the modules in order
- Set one module as a prerequisite for another module
To add a completion rule to a module:
- Click on the module that you want to apply the rule to
- Click the 3 dots next to the edit button
- Click ‘Completion Rules’
- If you want the modules to be completed in order, tick the first checkbox
- If you want to make any module(s) a prerequisite for the current one, select the prerequisite module(s) from the drop down list
The ‘Suggested Completion’ option sets a specific time limit on when the learning must be completed by. This feature is only designed for use by learning portal administrators who are building courses for their employees. Please do not use this feature.
Events
Events can be added to courses and are used for face-to-face courses or live webinars only. Events are only for content on Go1 Marketplace, they cannot be included in Premium content.
- Add the event learning item to your course, then use the editor on the right side to give your event a description.
- Click ‘Add date’ to set the event time, date, location and attendee limit.
- Use the calendar and time selectors to set the date and start/finish times and set a timezone. For multi-day events, click ‘Add end date’ to set an end time on another day.
- Enter a location name for your event (e.g. ‘Sydney Convention Centre’), then click the ‘Create location' confirmation. This will open the location editor. For webinars, tick the ‘Online’ checkbox. For face-to-face events, fill in the required address fields then click ‘Done’. Once you have entered the address, a Google Maps snapshot of the location will be automatically added.
- The fields of ‘Location details’ and ‘Attendee limit’ are optional. When you are finished, click ‘Done’ to save.
- After saving your course, go to the ‘Settings’ tab (above the course description), then select ‘Enrolment Settings’. Use the drop-down under ‘Allow enrolment’ to change this setting to ‘Enquiry’. Go1 Support will reach out when a learner enquires about your event.
Assignments
You may notice that you can add an ‘Assignment’ learning object in your course. These allow learners to upload an item for assessment (for example, a logbook of training hours). This learning object type is only designed for use by learning portal administrators who are building courses for their employees. Please do not use this learning object type.
Save, Publish & Share Your Content
As soon as you add a title to your learning object, it will automatically save. Any new changes are automatically saved as you go.
You can publish and share your content depending on your needs:
I don’t want anyone to see the content just yet
Once your latest changes are saved, click the X in the top left to exit the editor without publishing your item.
I only want to share my content with learners in my portal
Click ‘Publish’ in the top right to allow learners from your portal to see and enrol in your content.
I want to share my content to the Go1 Premium library
Click ‘Visibility and access’ in the top right, then click ‘Add’ next to Premium. After closing the Visibility and Access pop up, click ‘Publish’. Your content will be reviewed by our team before it is launched live. If you are a newly signed partner and this is your first batch of content, please email your Content Partner Success Manager to inform them that you are ready to launch your content.
I want to share my content to the Go1 Marketplace
The Go1 Marketplace allows customers without access to Premium to purchase individual courses. You may share content here for free, or include a price. While editing the learning object, click ‘Visibility and access’ in the top right, then click ‘Add’ next to Marketplace. After closing the Visibility and Access pop up, click ‘Publish’. Your content will be reviewed by our team before it is launched live.
I want to share my content with a selected group of customers only
To share your content with a select group of customers according to your agreement with Go1, email support@go1.com with the learning object names to let them know you have new content ready to share.
Go1 Premium & Marketplace
Before content is published to the Premium or Marketplace libraries, our team will review it to ensure it meets our content standards, including:
- The content launches and plays without errors
- The minimum mandatory metadata has been supplied:
- Image
- Title
- Description
- Learning outcomes
- Duration
- Topics
- Level
For content where the metadata fields of mobile optimised, assessable and WCAG 2.0 AA compliant are applicable:
The value for these is set as “unsure” by default. We strongly recommend filling in this field to enable learners to find the content that meets their needs.
Edit your content
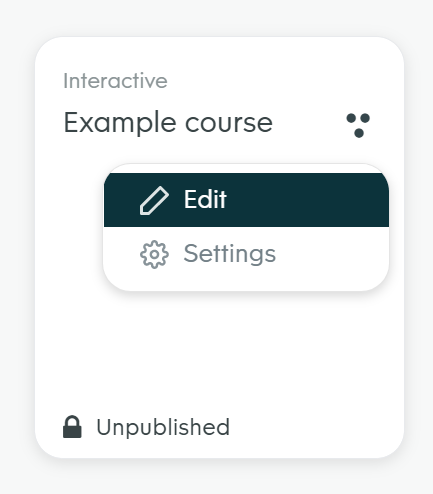
To edit a learning object after you have created it;
1. Find the item in the ‘Resources’ section on your ‘My Teaching’ page (or if you have too many items, search by title using the search bar at the top of the page)
2. Click the 3 dots on the right and select ‘Edit’
To edit the file uploaded to a course:
- Documents: In edit mode on the learning object, drag and drop your document into the box above the existing document (or click to open file explorer). The old document will be replaced.
- Videos: In edit mode on the learning object, click the grey icon underneath the video to remove it. Then add the new file as usual.
- Interactives: In edit mode on the learning object, click the red ‘remove’ button, then add your new file as usual.
Learn more
Learn more about getting started & onboarding your content with Go1: