Plug and play by integrating our embeddable content catalogue component into your application.
This guide walks through the process of building and launching your integration with Go1, using our embeddable content catalogue component - allow your users to discover Go1 content within your application, then import and consume the content via authenticated play link.
The Go1 Catalogue component is an embeddable content discovery and curation interface, that enables integrators to easily and quickly surface the entire Go1 library within their application. The tool comes pre-fit with Go1's search and filtering capabilities, allowing customers within your application to easily discover and select the content they wish to consume.
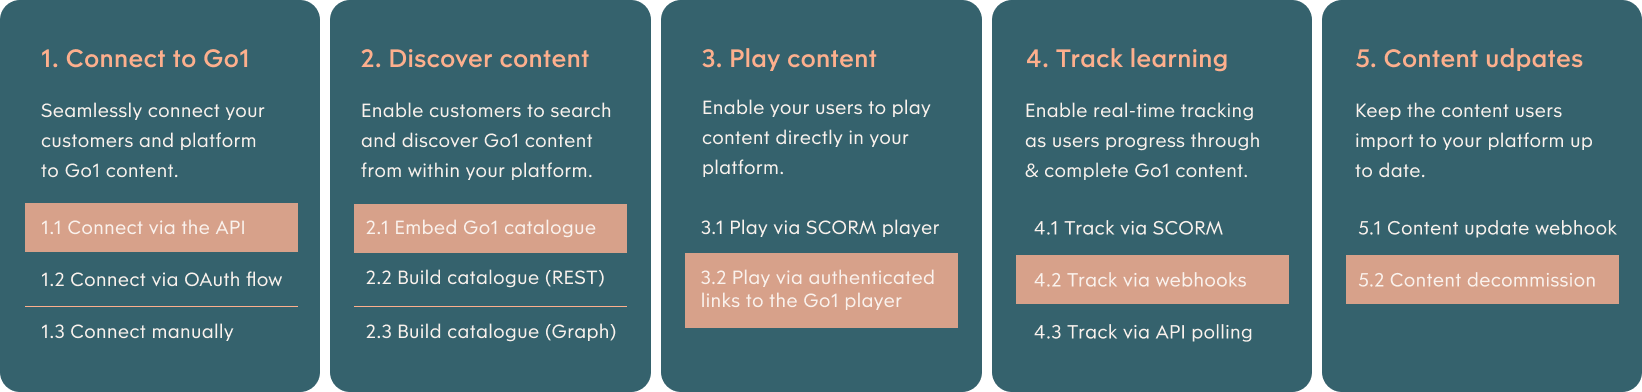
The steps in this guide are outlined below and have been assembled together as a recipe from our wider integration concepts to help you integrate by following a simple step by step process. You can review all of the integration options outlined in the image below or via the developer docs homepage.
Before you begin, we recommend reviewing our Getting Started guide to ensure you have everything ready to start integrating with Go1. This guide will help you get set up with a Go1 account and API keys to begin building your integration.
Connect your customer to Go1 by auto-provision customer accounts using the Onboard API endpoint.
Overview
This guide demonstrates the process of creating a customer account, also known as a portal, using the onboard API. By following the steps of this guide – you will have the toolset to programmatically provision Portals for your customers. Each onboarded customer will provide you with a unique access_token which you will need for future interactions when calling the API on the customer's behalf.
Why creating customer portals is required?
When integrating with Go1 under a Reseller or Referrer arrangement (ie. you are partnering with Go1 to provide a content offering to your customers), you are required to create a unique portal entity for each customer you provide content to.
Customer portals are the gateway for each customer (and their users) to access Go1 content and contains unique information about customer usage for reporting, billing & insights.
Why use the API to create customer portals?
Creating customer portals via the onboard API is the most flexible solution for connecting your customers to Go1. It allows you to control the entire user experience programmatically when setting your customers up with access to Go1 content.
How it works
There are two interactions required to create customer portals via the onboard API.
- Authentication: Retrieve an access token with your Partner API Keys
- Create a portal: Make a POST request to the /v2/onboard endpoint
We’ll walk through both of these steps in greater detail below.
Preparation
Although a simple API call creates a Customer Portal, you’ll need to ensure you have all of the required fields ready to build this request. Below is a list of the key details you’ll need to prepare:
- name, the customer's company name.
- industry, the customer's industry (see accepted industry list).
- country, the country that the customer primarily operates in (see accepted country list).
- domain, the domain name for the new portal. Must be a first-level subdomain to mygo1.com, eg. newportalexample.mygo1.com. A unique identifier for the customer is often used here.
- content_group_ids, the content bundles that the new customer portal should be given access to. These ids will be provided by our Implementations Team during your onboarding.
- seats, the total number of employees in the customer's organisation.
- email, first_name, last_name, phone, the user details of the customer's primary contact.
- consent, acceptance of the Go1 terms of service (IMPORTANT: see your requirements for obtaining user content).
In addition to preparing the above customer details, familiarize yourself with the below attributes that will be included in the API request:
- creation_path, the creation path attribute logs whether the customer portal being created is a ‘test' or a ‘live’ portal. Set the creation path to “test” when creating dev & test portals. Set the creation path to “integration” when you create live customer portals.
- partner_portal_id, the partner portal id attribute is a unique identifier for Go1 Partners that will link all created customer portals to the partner for reporting and billing purposes. Our Implementations Team will provide you with your ID during onboarding (to learn more, contact us at integrations@go1.com).
- notifications, created portals have a set of default email notifications that will be sent to users who access Go1 content (see Go1 Notifications). To disable notification when creating a new portal, set this value to “false”. Else set this value to “true” to keep notifications enabled.
For a complete list of available attributes in the onboard request, see the API Reference.
Implementation steps
Step 1. Authentication: Retrieve a partner access token
An access token is required to authorize a request to the Onboard API. In this guide, we recommend using the Client Credentials authentication grant type to retrieve your access token. We’ll walk through the process to retrieve an access token in the steps below.
You will need your Partner API credentials (client id & client secret), to complete this request. See the Partner API Keys Setup Guide if you do not yet have your client id & secret available.
1.1. To retrieve an access token, make a POST request to https://auth.go1.com/oauth/token passing in your partner Client ID and Secret, and setting the grant type to client_credentials.
curl --location --request POST 'https://auth.go1.com/oauth/token' \
--header 'Content-Type: application/x-www-form-urlencoded' \
--data-urlencode 'client_id=<PARTNER_CLIENT_ID>' \
--data-urlencode 'client_secret=<PARTENR_CLIENT_SECRET>' \
--data-urlencode 'grant_type=client_credentials'
1.2. The result of a successful request will return an access_token.
 {
    "token_type": "Bearer",
    "expires_in": 43200,
    "access_token": "eyJ0e3efms33f..."
 }
The returned access token will be used to authorize your onboard API request in step 2 below. Note, the returned token is valid for 12 hours, at which point you will need to request a new token.
Reference Documentation
- Auth Reference: Token Endpoint
- To learn more about authentication with the Go1 API - see our complete Authentication documentation
Step 2. Create a portal: POST /v2/onboard
2.1. To create a portal, make a POST request to https://api.go1.com/v2/onboard.
Header
{
  "Authorization": "Bearer <ACCESS_TOKEN>",
  "Content-Type": "application/json"
}
Body
{
  "creation_path": "integration",
  "customer": {
    "name": "<CUSTOMERS NAME>",
    "industry": "<CUSTOMERS INDUSTRY>",
    "country": "<CUSTOMERS COUNTRY>"
  },
  "partner_portal_id": <PARTNER_ID>,
  "portal": {
    "domain": "<CUSTOMERIDENTIFIER>.mygo1.com",
    "seats": 5,
    "content_group_ids": [<CONTENT_GROUP_IDS>],
    "client_auth": true,
    "notifications": false
  },
  "user": {
    "email": "<CUSTOMERS_EMAIL>",
    "first_name": "<CUSTOMERS_FIRSTNAME>",
    "last_name": "<CUSTOMERS_LASTNAME>",
    "password": "<PASSWORD>"
    "phone": <CUSTOMERS_PHONE_NUMBER>,
    "consent": {
      "term_privacy": true,
      "term_tos": true,
      "term_collection": true
    }
  }
}
2.2. A successful request will return the newly created portal and user object in the response, as well as the customer's access & refresh tokens and client id & secret.
{
  "user": {
    <USER_DETAILS>,
    "oauth_token": {
      "token_type": "Bearer",
      "expires_in": 43200,
      "access_token": "eyJ0eXAiOiJKV1QiLC...",
      "refresh_token": "def50200428beca7e..."
    }
    },
  "portal": {
    <PORTAL_DETAILS>,
    "client_auth": {
      "client_id": "0jh3hewa34vvsdzcvgy4C...",
      "client_secret": "82jf8jw383fefe33f3EE...",
      "redirect_uri": "http://localhost"
    }
  }
}
2.3. Store the returned customer's access & refresh tokens and client id & secret. These credentials will be used in future interactions when calling the API on the customer's behalf.
- The access token can be used immediately to authorize requests to the API on the customer's behalf. Note - the access token has an expiration of 12 hours.
- The refresh token should be stored and used to fetch a new access token and refresh token when the current access token expires (see Authentication Grant Type: Refresh Token). Note - the refresh token is a single-use token, and has an expiration of 90 days.
- The client credentials (client id & secret) are the customer's unique API credentials. These credentials can be stored and used as an alternative or backup mechanism to authenticate with the API on the customer's behalf - ie. to retrieve an access token if the current access token is ever lost.
Reference Documentation
Learn more
Learn more about working with customer Portals.
- Managing customer portals (coming soon)
- Authentication
- Full API Reference
You're done, great job! For more information or to see what else is possible with Go1, explore our Concepts or API reference.